Chrome //net-internals/#dns Clear Host Cache Easy Steps
Google Chrome is one of the most widely used web browsers globally, offering speed, reliability, and a vast library of features. However, like any browser, Chrome isn’t immune to occasional hiccups. One common issue users face is related to the DNS (Domain Name System) cache, which sometimes causes web pages not to load properly, display outdated information, or result in DNS-related errors.Fortunately, Chrome provides a built-in tool for flushing the DNS cache: chrome://net-internals/#dns. This article provides easy steps to clear host cache in Chrome, explains why it’s important, and covers troubleshooting tips to ensure smoother browsing.
What is DNS Cache?
Before jumping into the steps, it’s important to understand what DNS cache is.When you visit a website, your browser translates its human-readable domain name (like example.com) into an IP address through DNS servers. To save time on future visits, Chrome stores these DNS lookups locally in a DNS cache.
Benefits of DNS Cache:
-
Faster website loading times.
-
Reduced reliance on external DNS servers.
-
Improved browsing efficiency.
Problems Caused by DNS Cache:
-
Websites may not load due to outdated DNS records.
-
DNS errors like “Server not found” or “DNS_PROBE_FINISHED_NXDOMAIN”.
-
Recently migrated websites may still point to old IP addresses.
-
SSL certificate or connection issues.
That’s where clearing the DNS cache comes in handy.
Why Clear the DNS Cache in Chrome?
Here are some common scenarios where clearing the host cache is useful:
-
Website Not Loading Correctly – If a site recently moved to a new server or updated DNS records, old cache may prevent access.
-
Resolving DNS Errors – Errors like DNS_PROBE_FINISHED_BAD_CONFIG can often be fixed by flushing the DNS.
-
Privacy Concerns – Clearing DNS cache removes stored records of previously visited websites.
-
Speed Optimization – If the cache gets bloated or corrupted, Chrome may take longer to load sites.
-
Troubleshooting Network Issues – Helps isolate whether the issue is with the cache or the internet connection.
Easy Steps to Clear DNS Cache in Chrome
Here’s a step-by-step guide for clearing the DNS cache using chrome://net-internals/#dns.
Step 1: Open Google Chrome
Launch your Chrome browser on your PC, laptop, or Chromebook.
Step 2: Access Net-Internals Page
Type the following in the Chrome address bar and press Enter:
chrome://net-internals/#dns
This will open Chrome’s Net-Internals DNS page, a diagnostic and debugging tool.
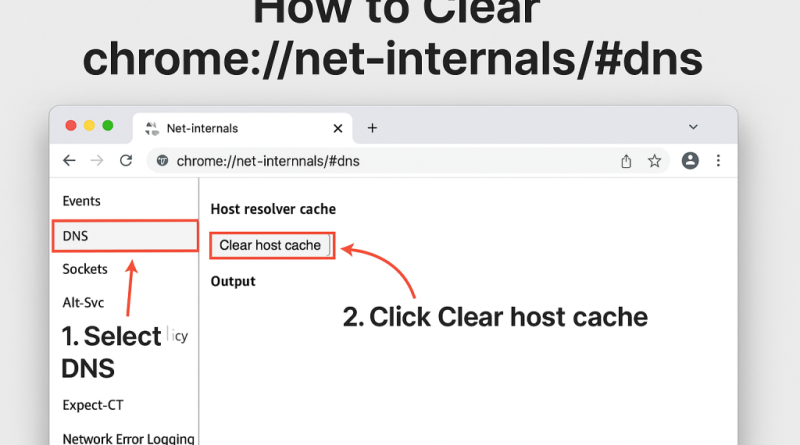
Step 3: Locate the “Clear Host Cache” Button
On the DNS page, you’ll see an option labeled “Clear host cache”. This button is responsible for flushing the stored DNS records.
Step 4: Click on “Clear Host Cache”
Click the button once, and Chrome will instantly clear all cached DNS entries.
You won’t see a pop-up confirmation, but the cache is cleared immediately.
Step 5: (Optional) Clear Sockets Cache
For best results, it’s recommended to clear the sockets cache as well. Here’s how:
-
In the same Chrome tab, replace the URL with:
2.Click “Flush socket pools.”
This ensures that both DNS records and active network connections are reset.
Step 6: Restart Chrome
After flushing the DNS and sockets, close all Chrome windows and restart the browser.
Now, revisit the website that was causing issues. It should load with fresh DNS records.
Alternative Ways to Clear DNS Cache
Besides Chrome’s built-in method, you can also clear DNS cache at the operating system level.
On Windows:
-
Open Command Prompt (Run as administrator).
-
Type:
-
Press Enter.
You’ll see a message confirming the DNS Resolver Cache was successfully flushed.
On macOS:
-
Open Terminal.
-
Type:
sudo killall -HUP mDNSResponder
Enter your password and press Enter.
On Linux:
For most Linux distributions:
sudo systemd-resolve –flush-caches
Troubleshooting If DNS Flushing Doesn’t Work
If clearing the DNS cache doesn’t resolve the issue, try these additional steps:
-
Clear Chrome browsing data: Go to Settings > Privacy > Clear browsing data > Select Cached images and files + Cookies.
-
Disable extensions: Sometimes, faulty extensions interfere with connections.
-
Check your internet connection: Restart the router or switch networks.
-
Use Google Public DNS: Change your DNS settings to
8.8.8.8and8.8.4.4. -
Update Chrome: Outdated versions may have DNS bugs.
Advantages of Clearing DNS Cache Regularly
-
Prevents website loading issues.
-
Ensures up-to-date DNS records.
-
Improves security by removing stored DNS history.
-
Helps in troubleshooting network errors quickly.
-
Enhances browsing performance.

Conclusion
Clearing the DNS cache in Chrome using chrome://net-internals/#dns is a simple yet powerful way to fix browsing issues, speed up site loading, and resolve DNS-related errors. By following the easy steps outlined above—open Chrome, navigate to the DNS page, click “Clear host cache,” and flush socket pools—you can ensure smoother and faster browsing.If problems persist, clearing DNS at the system level or switching to a reliable DNS service can further enhance your internet experience.
Frequently Asked Questions (FAQ)
1. What does chrome://net-internals/#dns do?
It opens Chrome’s internal DNS management page, where you can view cached DNS records and clear them using the “Clear host cache” button.
2. When should I clear the DNS cache in Chrome?
You should clear the DNS cache if:
-
A website isn’t loading properly.
-
You see DNS errors like DNS_PROBE_FINISHED_NXDOMAIN.
-
A site has recently migrated to a new server but still loads the old version.
-
You’re troubleshooting internet connectivity issues.
3. Will clearing DNS cache delete my browsing history?
No. Clearing the DNS cache only removes stored DNS lookups (domain-to-IP mappings). Your browsing history, bookmarks, and saved passwords remain untouched.
4. Do I need to clear sockets cache as well?
It’s recommended. Clearing the socket pools ensures Chrome disconnects from active connections and establishes fresh ones, making the DNS flush more effective.
5. How often should I clear the Chrome DNS cache?
There’s no fixed schedule. Clear it only when you face problems like:
-
Websites not loading correctly.
-
Frequent DNS-related errors.
-
Outdated website versions showing up.
6. Does flushing the DNS cache make browsing faster?
Yes, in some cases. A corrupted or bloated DNS cache may slow down connections. Clearing it forces Chrome to fetch fresh DNS records, which can improve site loading.
7. Is clearing DNS cache safe?
Yes. It’s completely safe and often recommended when troubleshooting. It won’t harm your system or browser settings.
8. Can I clear DNS cache on mobile Chrome (Android/iOS)?
Mobile Chrome doesn’t provide chrome://net-internals/#dns. Instead, you can:
-
Restart the device (which clears DNS cache).
-
Switch to airplane mode and back.
-
Clear browsing data from Chrome’s settings.
9. What’s the difference between clearing DNS cache in Chrome and Windows?
-
Chrome DNS cache only clears records stored in the Chrome browser.
-
Windows/macOS/Linux DNS cache clears records stored at the operating system level, affecting all browsers.
For best results, clear both if you’re facing persistent issues.
10. Do I need admin rights to clear DNS cache in Chrome?
No. Unlike system-level DNS flushing (which may require administrator access), Chrome’s DNS cache can be cleared by any user directly from the browser.