How to Clean Boot Windows 11 and Fix Performance Issues
When your Windows 11 system starts behaving abnormally slow startups, app crashes, or strange errors a clean boot is often one of the most effective troubleshooting methods. Performing a clean boot allows your computer to start with only essential Microsoft services, which helps isolate software conflicts and identify the root cause of performance issues. In this comprehensive guide, you’ll learn what a clean boot is, why it’s useful, and how to perform a clean boot step-by-step in Windows 11. We’ll also explore how to revert back to a normal startup once you’ve finished troubleshooting.
What is a Clean Boot?
A clean boot is a way to start Windows using a minimal set of drivers and startup programs. It helps eliminate software conflicts that occur when you install a program, update drivers, or run a background process. Unlike Safe Mode, a clean boot loads Windows in a normal visual state, but with all third-party services and unnecessary startup applications disabled. This makes it especially useful for pinpointing problems without sacrificing the full Windows experience.
Why Perform a Clean Boot in Windows 11?
Performing a clean boot can help diagnose a range of problems, such as:
-
Applications freezing or crashing
-
System performance issues
-
Unexpected restarts
-
Windows update failures
-
Blue screen errors (BSOD)
-
Driver conflicts
-
Third-party software interfering with built-in features
A clean boot lets you identify if a startup program or service is the cause of your issue, helping you eliminate it without affecting the rest of your system.
Difference Between Safe Mode and Clean Boot
Many people confuse Safe Mode with Clean Boot, but they serve different purposes:
| Feature | Safe Mode | Clean Boot |
|---|---|---|
| Purpose | Diagnose basic Windows problems | Troubleshoot software and startup conflicts |
| Interface | Limited (basic drivers and visuals) | Normal Windows interface |
| Services | Minimal system services | Only Microsoft services active |
| Startup Programs | Disabled | Disabled (except essential Microsoft ones) |
| Use Case | Malware removal, boot issues | Application conflicts, slow performance |
In short, Clean Boot is ideal when you suspect background programs or services are interfering with your system.
Preparations Before You Perform a Clean Boot
Before jumping into a clean boot, take the following precautions:
-
Backup your files: Always a good idea before making system changes.
-
Note down active startup apps: You may want to restore them later.
-
Log in as an administrator: Required to make system-level changes.
-
Close all programs: Save your work to prevent data loss.
Once you’re ready, follow the steps below.
Step-by-Step Guide to Perform a Clean Boot in Windows 11
Step 1: Open System Configuration (msconfig)
-
Press Windows + R to open the Run dialog.
-
Type
msconfigand hit Enter or click OK. -
The System Configuration window will appear.
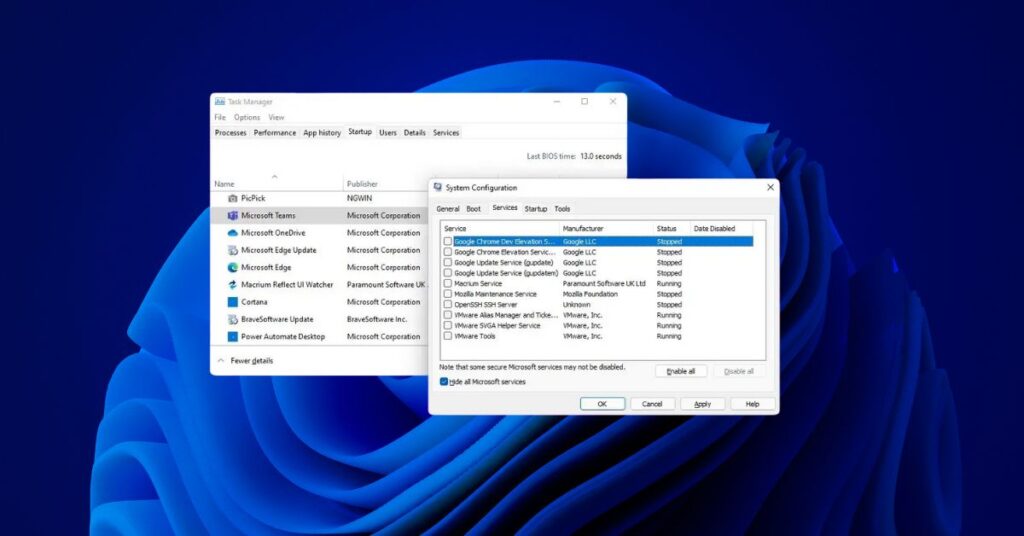
Step 2: Disable Third-Party Services
-
In the System Configuration window, go to the Services tab.
-
Check the box “Hide all Microsoft services” at the bottom left.
-
Click Disable all to turn off all non-Microsoft services.
-
Click Apply, but don’t restart yet.
Note: Hiding Microsoft services is essential. Disabling them may lead to system instability.
Step 3: Disable Startup Programs via Task Manager
-
Press Ctrl + Shift + Esc to open Task Manager.
-
Go to the Startup tab.
-
For each enabled item, right-click and choose Disable.
-
Close Task Manager.
Step 4: Restart Your Computer
After making the changes:
-
Go back to the System Configuration window.
-
Click OK and then Restart your PC.
Your computer will now boot in a clean environment.
How to Troubleshoot with Clean Boot
After rebooting, observe your system:
-
Is the problem gone? If yes, a background app or service is likely to blame.
-
Still seeing issues? Then the issue may not be software-related.
To pinpoint the culprit:
-
Open System Configuration again.
-
Go to the Services tab.
-
Enable a few services at a time (e.g., 5 at a time), then reboot.
-
Repeat until the issue resurfaces.
-
Do the same for Startup items via Task Manager.
Once you find the problematic service or startup app, you can either:
-
Uninstall it
-
Disable it permanently
-
Contact the developer for support
This process is called selective startup troubleshooting and is highly effective.
How to Restore Normal Startup in Windows 11
Once you’ve resolved your issue, you can restore normal startup:
-
Open the System Configuration window again (
msconfig). -
In the General tab, select Normal startup.
-
Click Apply.
-
Go to the Services tab, uncheck “Hide all Microsoft services.”
-
Click Enable all (or selectively enable what you want).
-
Open Task Manager, re-enable the apps you want at startup.
-
Restart your computer.
Your system will now boot with your previous settings.
What to Do If Clean Boot Doesn’t Fix the Issue
If a clean boot doesn’t solve the problem, consider the following:
1. Run System File Checker
-
Open Command Prompt as administrator.
-
Type:
sfc /scannowand hit Enter. -
Let it complete and follow any instructions.
2. Use DISM Tool
-
In the same Command Prompt, run:
-
Wait for the process to finish.
3. Boot into Safe Mode
Try Safe Mode for more advanced troubleshooting.
To enter Safe Mode:
-
Go to Settings > System > Recovery.
-
Under Advanced startup, click Restart now.
-
Navigate to Troubleshoot > Advanced options > Startup Settings > Restart.
-
Press the number for Safe Mode with Networking.
4. Restore from a System Restore Point
If you created a restore point before, use it to go back in time.
-
Press Windows + S, type “System Restore”, and choose “Create a restore point”.
-
Click System Restore.
-
Follow the wizard to select a restore point and revert changes.
Conclusion
A clean boot is a powerful diagnostic method that helps identify and resolve software conflicts in Windows 11. Whether you’re experiencing random crashes, sluggish performance, or application errors, clean booting your system can lead you to the root cause. By following the step-by-step guide in this article, you can isolate issues, test solutions, and bring your PC back to optimal performance. Remember to always restore your system to normal startup once troubleshooting is complete. If a clean boot doesn’t resolve your issue, consider further actions like Safe Mode, System File Checker, or consulting with professional support.
Frequently Asked Questions
Q: Will I lose any data during a clean boot?
A: No. A clean boot only changes system startup behavior. Your files and settings remain untouched.
Q: Is clean boot the same as Safe Mode?
A: No. Clean boot uses the full Windows interface and disables only third-party items, while Safe Mode loads minimal drivers and services.
Q: How often should I perform a clean boot?
A: Only when troubleshooting. It’s not recommended for daily use.
Q: Can I perform a clean boot without admin rights?
A: No. You must be logged in as an administrator to change startup settings.
Q: My antivirus won’t run after clean boot. Is that okay?
A: Yes, because third-party services are disabled. This is temporary for troubleshooting only. Do not stay in clean boot mode permanently.